Conditional Rendering
React components render content based on their state, and by combining multiple React components, you can create complex UIs. To create such complex UIs, React components need to be able to use logic, and depending on this logic, UI elements will be displayed on the screen. Before diving into this, we must first learn how to use the JSX template syntax to render UI elements.
1. JSX
JSX is an extended syntax for JavaScript that looks similar to HTML at first glance. Since JSX is an extension of JavaScript, it is used as the template language in React, providing access to all JavaScript features. Let’s first look at some examples:
React Element without JSX:
const element = React.createElement(
  "div", null, React.createElement(
    "a", null, "Hello JSX with BABEL!", ""
  )
);
React Element with JSX:
const element = (
  <div>
    <a> { "Hello JSX with BABEL!" } </a>
  </div>
);
Both code examples produce the same result. Even though the code is short, it’s clear that the second example is much more readable than the first. Additionally, since JSX allows JavaScript expressions within {}, we can use JavaScript syntax inside <a> { "Hello JSX with BABEL" } </a>.
While JSX is not mandatory in React, it significantly improves readability and convenience.
1-1. BABEL
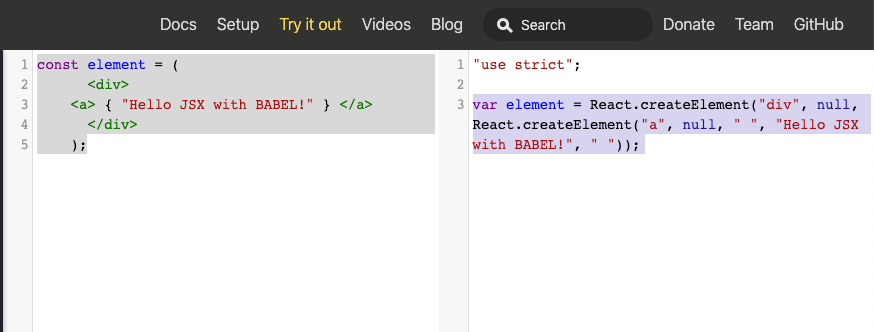
The JSX syntax above cannot be used as is. To use JSX, you need to import React. import React from 'react'. React uses React.createElement() to transform JSX into JavaScript code. This transformation happens via a tool called BABEL. Let’s look at how BABEL handles the transformation of the two examples above.

BABEL converts the JSX syntax on the left into the React.createElement syntax on the right. (You can check this on the official BABEL website: [https://babeljs.io/])
1-2. JSX Syntax
-
Using expressions in JSX:
const name = 'JH Kim'; const element = <div> `my name is ${name}` </div>; -
Using functions in JSX:
function Introduce() { return ( <div> `my name is ${name}` </div> ) } -
JSX in functional components:
const Introduce = (props) => { return <div> `my name is ${props.name}` </div> } -
JSX in class components:
class Introduce extends React.Component { render() { return <div> `my name is ${this.props.name}` </div> } } -
JSX with multiple child elements:
const Introduce = (props) => { return ( <div> <h5>`Hello!`</h5> <h5>`my name is ${props.name}`</h5> </div> ) } -
Incorrect JSX syntax:
const Introduce = (props) => {
  return (
    <h5>'Hello'</h5>
    <h5>`my name is ${props.name}`
  )
}
JSX allows you to return only a single element. Additionally, make sure to close all tags properly.
const Introduce = (props) => {
  return (
    <div>
      <h5>'Hello'</h5>
      <h5>`my name is ${props.name}`</h5>
    </div>
  )
}
2. Conditional Rendering
In React, you can create distinct components that encapsulate the behavior you need and render only some of them, depending on the state of your application. - Official React documentation on Conditional Rendering
2-1. Rendering using the Ternary Operator
The ternary operator is typically used to render elements based on a condition: one element for true, and another for false.
const LoginedUser = (props) => {
  return <div> `Hi ${props.name} [User] Welcome to React!` </div>
}

const Guest = (props) => {
  return <div> `Hi ${props.name} [Guest] Welcome to React.` </div>
}

class MainPage extends React.Component {
  render() {
    const { isLogined } = this.props;
    return (
      isLogined
        ? <LoginedUser name={'JH Kim'} />
        : <Guest name={'CH Kim'} />
    )
  }
}
In this code, based on the isLogined prop, if it’s true, the LoginedUser component is rendered; if false, the Guest component is rendered.
2-2. Rendering using the AND (&&) Operator
Rendering with the AND (&&) operator is useful when you want to exclude certain elements that don’t meet a condition.
class UserInfo extends React.Component {
  render() {
    const { user } = this.props;
    return (
      <form>
        <label>
          Id:
          <p> { user && `${user.id} `} </p>
        </label>
        <label>
          Name:
          <p> { user && `${user.name} `} </p>
        </label>
        <label>
          Age:
          <p> { user && `${user.age} `} </p>
        </label>
      </form>
    )
  }
}
In this code, if the user prop is absent, nothing will be displayed. If user is passed, the Id, Name, and Age values will be rendered.
2-3. Rendering using if Statements
To use if statements within JSX, you generally need to use an Immediately Invoked Function Expression (IIFE). While the two previous methods are typically sufficient, if statements are useful for more complex conditions, especially when you need to separate logic from JSX.
class Grade extends React.Component {
  render() {
    const { grade } = this.props;
    return (
      (() => {
        if (grade <= 50) return (<div> F </div>);
        if (grade > 50 && grade <= 60) return (<div> D </div>);
        if (grade > 60 && grade <= 70) return (<div> E </div>);
        if (grade > 70 && grade <= 80) return (<div> C </div>);
        if (grade > 80 && grade <= 90) return (<div> B </div>);
        if (grade > 90 && grade <= 100) return (<div> A </div>);
      })()
    )
  }
}
Conclusion
So far, we’ve explored how to use JSX and conditional rendering in React. JSX helps you write React elements more easily and is readable due to its inclusion of JavaScript syntax. It also allows for more efficient code writing. In the next article, we’ll dive deeper into how to render different data structures (like List, Map, and Tree) on the screen using JSX and conditional rendering.


